One of the key goals of TheraSaaS is to make your sales, marketing, and intake processes as efficient as possible — including improving your lead conversion rate. Tracking the reasons for lost leads helps you identify patterns, understand challenges, and make informed adjustments to your workflows.
This article will guide you through:
How to build a customized Lost Reason opportunity field
How to build a custom reporting widget based on Lost Reasons
Creating and Customizing the “Lost Reason” Field
Lost Reason is a fully customizable opportunity field designed to capture the reason why lead was lost. This field appears automatically inside of your Opportunity Card when an opportunity is marked as Lost.

Step 1: Customize Lost Reasons in Your Account
Navigate to Settings → Custom Fields → Folders →Opportunity →
Opportunity Details.

Locate the field named Lost Reason.
Click the three dots (⋮) on the right-hand side and select Edit.
Add or modify the most common reasons your leads fall through — for example:
Chose another provider
Budget constraints
Timing not right
Lack of engagement
Not a good fit
Click Save once done.
Note:
Lost Reason is a default field, but the options are fully customizable.
It resides inside your Opportunity Card, under the Opportunity Details folder.
By default, the Lost Reason pop-up will appear whenever you mark an opportunity’s status as Lost.
2. Building a Custom Reporting Widget Based on Lost Reasons
Once your team consistently tracks Lost Reasons, you can visualize this data using a custom reporting widget in TheraSaaS dashboards.
Note: You'll need to create a custom dashboard to add custom widgets—the default dashboard will not be editable.

Go to Dashboards
Navigate to the Dashboards section in your account.
Open the Custom Dashboard
Click on the custom dashboard where you’d like to add the Lost Reasons report.
Edit the Dashboard
Click the Edit Dashboard button.
Add a Widget
Click on the Add Widget button.
In the Report Group, find Opportunities.
Select Lost Opportunities by Reason.
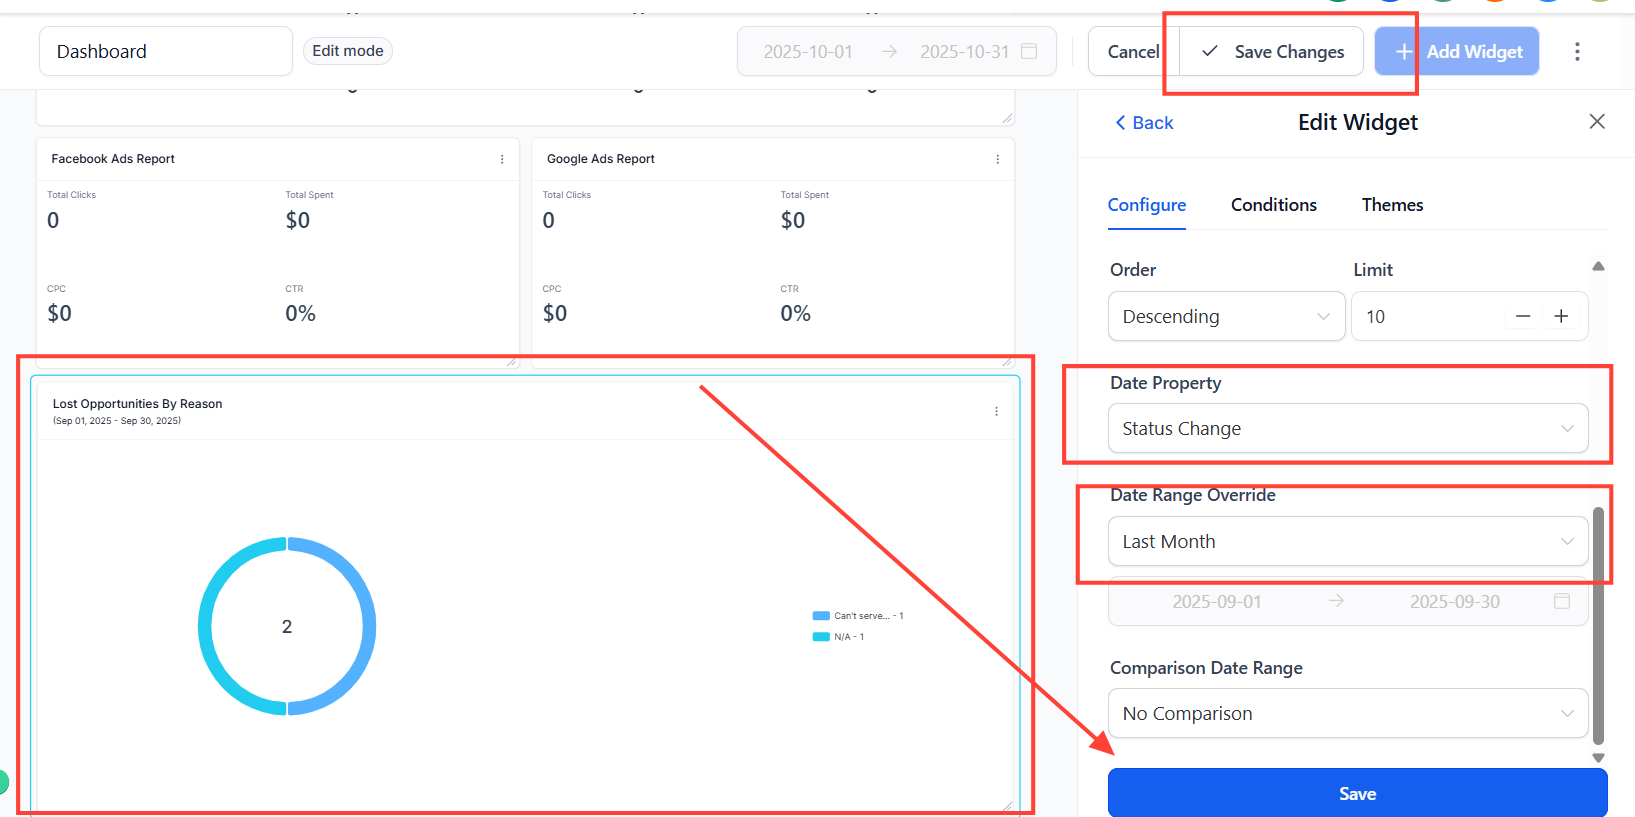
Configure Advanced Settings
Under Advanced Settings, set the Date Property to Status Change.
Choose the Date Range you want the widget to consider (e.g., This Week, Last Month, Last 30 Days).
Save Your Changes
Click Save on the widget.
Then, click Save Changes on the dashboard.
(Optional)
Customize the visuals or resize the widget as needed.
When saved, the Lost By Reason report will be automatically updated in accordance with the date range selected.
To learn more about custom report creation, check out this Article.
Was this article helpful?
That’s Great!
Thank you for your feedback
Sorry! We couldn't be helpful
Thank you for your feedback
Feedback sent
We appreciate your effort and will try to fix the article